Data Volumes for Notebook Servers
We will show how you can use DLF to provision Data Volumes for your notebook servers. This would be helpful in the cases your training data are stored in S3 Buckets.
Requirements
You have access to the kubeflow dashboard and you have DLF installed.
Make sure you first follow the guide for Installation
Create a Dataset for the S3 Bucket
In this guide, we assume that your data are already stored in a remote s3 bucket.
Let's assume that you will launch your notebook server on the namespace {my-namespace}
apiVersion: datashim.io/v1alpha1
kind: Dataset
metadata:
  name: your-dataset
spec:
  local:
    type: "COS"
    accessKeyID: "access_key_id"
    secretAccessKey: "secret_access_key"
    endpoint: "https://YOUR_ENDPOINT"
    bucket: "YOUR_BUCKET"
    region: "" #it can be empty
kubectl create -f my-dataset.yaml -n {my-namespace}
Provision Notebook with the Data Volume
Now use the Kubeflow Central Dashboard to follow the rest of the guide. Choose the "Notebook Servers" item:
Select "New server":

Head over to the "Data Volumes" section and fill out the form as follows:
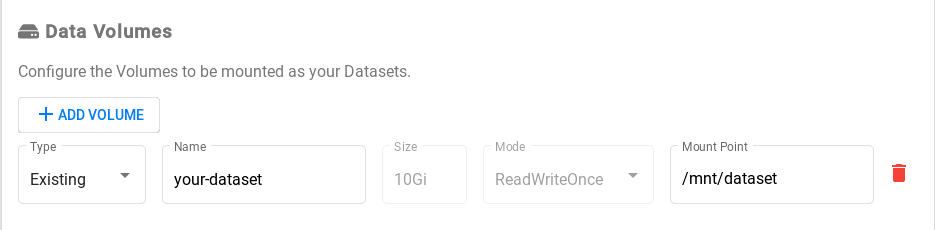
Now you can press "Launch" to start the notebook server.
After you connect, you can list the contents of /mnt/dataset and verity that the reflect the contents for your remote S3 bucket.
NOTE: all the changes that you do in this directory (delete,create,modify) will be reflected on the remote bucket